Nextro’s top 10 tips to get the most out of Genetec Security Center
Ensuring the safety and security of people and property as well as being operationally efficient are top priorities for Kiwi businesses. Installing and managing a comprehensive and unified security and analytics system with hundreds of cameras, access-controlled doors, intercoms, speakers, and alarm systems can, at first glance, appear to be a daunting task.
That’s why Nextro has combined its security system design and management capabilities with Genetec’s world-leading multi-technology platform that allows you to manage video surveillance, access control, license plate recognition with intrusion management, communications, and more.
In this blog post, we’ll explore 10 simple ways to take your monitoring and management tasks to the next level. Set out below are some Nextro ‘pro tips’ to optimise your operations, leverage key Genetec capabilities, and reduce the load on your security and operations teams.
1 – Customise your monitoring tile layouts
When you’re actively monitoring security, you can have several tiles with different video camera views up on the monitor. While that’s helpful, there are ways to maximize this space.
Try creating custom tile layouts and populating them with specific cameras, maps, or other important relevant data to what you’re overseeing. For instance, besides an important camera viewpoint, you can have tiles with live ALPR reads and a map layout of your building.
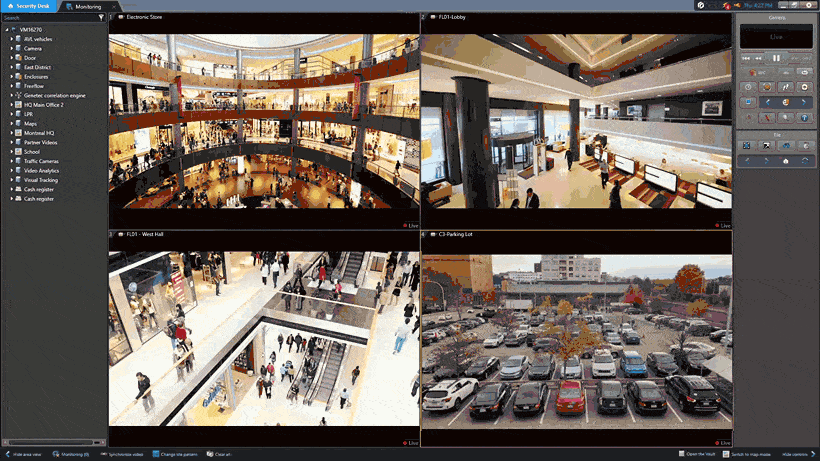
Each layout can be fully customized according to the monitoring task at hand. As a school security guard, you’ll be monitoring students as they come into the building by having several different views. These may be from your main entrance cameras, cars coming onto the property, and an overview of alarms on the map of your facility.
You can also create different tile layouts within the monitoring task in Security Center, name them, and save them for future use. That way, you can simply click on the custom tile layout you need for a specific job, and monitor with context using all the necessary information up on your screen.
2 – Configure your Visual Tracking overlays
Visual Tracking is a free feature in Security Center that can save you time during crucial moments to track suspects through a building. It also allows you to oversee video-based guard tours without leaving your office.
How does it work? You simply click on the graphical overlays of a specific area on a video tile to quickly switch from camera to camera. You can also hover over the overlay to get a preview of the video before clicking through to the camera.
Visual Tracking also works when looking at live or recorded video. That means you can follow intruders through your property during investigations, so you get a full forensic rundown of the event.
Taking time to configure your Visual Tracking settings is a must. It’s an easy setup process that allows you to quickly link cameras to one another—simply select a camera and then draw an overlay on the camera tile where you’d like to jump to the next view. You can then link that overlay to another camera, and you’re done. Overlays can be different sizes, shapes, and colors depending on your preferences or needs.
You can create as many overlays and camera links as you’d like, but generally, we recommend links that point to nearby cameras, so it’s easier for your team to move through a space or building as they would if they were walking the floor.
The best part is that you don’t need to do everything at once. You can start with your more sensitive or highly trafficked areas and expand from there.
3 – Get familiar with Quick Search
When you’re actively monitoring your environment, you might come across something that doesn’t look right. Using the Quick Search feature in Security Center, you can immediately investigate suspicious activity to find out what happened.
For example, let’s say you’re jumping through cameras and notice a window is broken in a specific area. You can launch the Quick Search tool by clicking the briefcase icon on the side panel of your monitoring task.
Quick Search helps you narrow down video recordings to find the exact moment that an incident occurred. It does this by showing you thumbnails from equally spaced-out times throughout the period in question. From there, you can expand the selection between the thumbnails to see a set of images within that period until you can pinpoint the incident footage.
You can then follow up with operators that were on duty at that time, or bookmark the event and log an incident if needed.
4 – Link all your entities
Many operators find value in using the Plan Manager map feature within Security Center. It allows them to quickly find doors, intercoms, and cameras, especially in larger, more widespread environments or multi-site installations.
And while most have added all their entities on their maps, not all have taken the time to link entities together. This means making sure your doors are associated with nearby cameras or intercoms and other devices.
When your entities are linked, you’re able to do things such as unlocking a door during an intercom conversation. You can also immediately see the associated video whenever someone badges at the door.
Linking your entities across your environment is a key step in getting the most from unified security. And while it seems like something small, this type of next-level configuration can pay dividends in speeding up your incident response times. It saves you from having to go back to your map and find a nearby device while you’re in the middle of handling an important task.
See how Plan Manager enhances monitoring.
5 – Try out the Incident Recording feature
When you’re monitoring your environment and catch an incident underway, wouldn’t it be helpful to start recording evidence immediately? That’s now possible using the Incident Recording feature in Security Center.
After enabling Incident Recording, you can drag the cameras you want to record into your monitoring tile. Video recordings from the cameras will then be automatically kept in sequence as one single video clip.
The Incident Recording feature lets you create a storyboard of the incident underway. You can then save and export that compiled video sequence with operator notes, alarms, or other information. This gives you a complete incident report to save for future reference or to share with third parties. Recipients can easily view the file through a video player.
Using the Incident report task in tandem with Visual Tracking is a powerhouse combination that streamlines your whole response and investigatory process. Not only will you be able to track intruders and collaborate with on-the-ground personnel to intercept them, but you can also package all your evidence and notes in one tidy, easy-to-share file.
Investigating an incident after the fact? Using Incident Recording can help you easily gather all your evidence in one place and streamline the entire investigative process.
Watch how Incident Recording works in real-time
6 – Start using built-in Privacy Protector
Today’s privacy laws require organizations to balance people’s right to privacy and security. Failure to comply with these evolving mandates can lead to significant penalties.
But ensuring privacy can be challenging when you have public-facing cameras near a school, hospital, or other high privacy-minded environments.
Investing in security solutions that are built with Privacy by Design offers several features that help you strengthen privacy compliance. Within Security Center, one of those built-in features is KiwiVision™ Privacy Protector.
This privacy feature allows your team to monitor live or recorded video while blurring specific areas or anything that isn’t the static background. Your operators will be able to clearly see the background context of a video tile and understand what’s happening, and they won’t be able to identify the individuals moving around. Should an incident occur, supervisors can access the unblurred footage to identify the culprits or submit the video as evidence.
Using Privacy Protector is a great way to freely monitor your spaces while upholding people’s rights to privacy and regulatory compliance.
7 – Activate the Camera Integrity Monitor
When you’re monitoring your environment, you need to make sure your cameras and other devices are working properly. If a device falls offline or gets covered without someone noticing, this leaves gaps in your security.
But when you have hundreds of cameras, you don’t have time to randomly check camera feeds around the clock. This is where the KiwiVision Camera Integrity Monitor comes into play.
When you activate this feature in Security Center, the system will automatically track and alert you to camera events such as tampering, decreased video quality, or abrupt directional change. This allows you to focus on monitoring the security of your environment while staying on top of any recurring or odd device failures that need addressing.
Using dynamic widgets, you’ll see a list of all incoming events alongside visual graphs that display the number and frequency of different events. You can then quickly investigate alarms or retrieve reports of these events to know when there are bigger issues at play, or if devices need replacing.
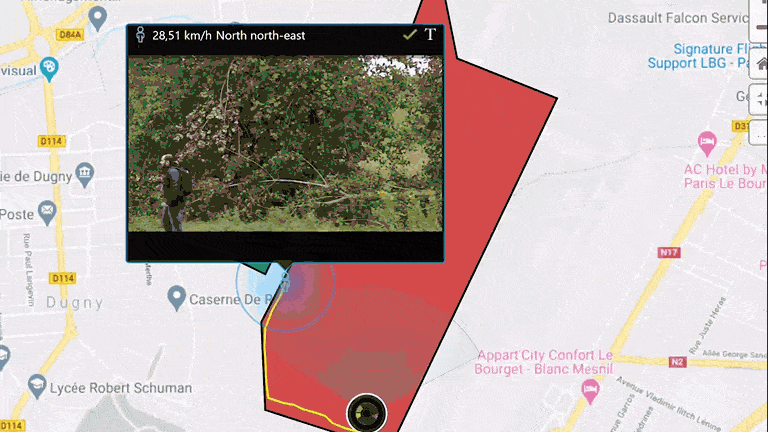
8 – Set up your analytics with intention
Using motion detection analytics can help operators identify and qualify threats faster when monitoring their environment. But if they’re not configured properly, then they may end up becoming more of a nuisance than a useful tool.
To get full value from this free feature in Security Center, it’s important to make sure you’re being thorough and thoughtful in your configuration. That means ensuring there’s purpose and intention in how the analytics are configured in the camera’s field of view.
For instance, if there’s a tree within the frame, you’re likely going to get many unnecessary notifications on a windy day. Simply adjusting the sensitivity of the motion detection on specific cameras can help here too.
Setting up other analytics such as crowd estimation and people counting can also be very useful in certain circumstances. For instance, you can receive notifications when people begin congregating in specific areas or be alerted to occupancy thresholds to adhere to fire and safety regulations.
9 – Unify your intrusion monitoring
Did you know that intrusion monitoring is now part of the base package in Security Center 5.11? That means you can do much more than manage your intrusion points, areas, and panels within Security Center. You can also assign various cardholders or groups different pins for arming and disarming specific zones and quickly respond to any intrusion alarms directly from a map of your facilities.
When you unify intrusion monitoring within Security Center, there’s so much richness in the functionality available to you. For instance, you can receive various types of intrusion alarms such as ‘wrong pin’, or ‘manual bypass’. When you respond to the intrusion event, you’ll be able to see the associated video and cardholder information. You can also associate different types of actions with specific events, such as triggering a threat level. This gives you a full picture of what’s happening and helps guide your operators on how to best respond to the situation.
Beyond that, you can configure automatic arming and disarming based on schedules. This ensures that if the last person to leave forgets to arm the system, your facility won’t be exposed. You can also pull reports on intrusion events to spot any recurring issues, or to help inform your investigations.
10 – Take a look at graphical reports
Traditional table reports are great for filtering down a data set to find entries of interest. This might include identifying who was in an area at a given time or who was the last person to leave the building. Graphical reports help you aggregate all your data to better understand what’s happening in your environment. They help you gain valuable insights such as seeing how many people accessed different buildings or how many alarms were acknowledged over the last week and by whom.
In Security Center, this is all available through visual reports and dashboards. So whether you’re looking at camera failures, door events, or intrusion alarms, you can retrieve information and have that displayed in a graph that includes either columns or stacked rows, or even a doughnut or pie chart. You can further filter these reports based on specific days, times, zones, facilities, types of events or alarms, and more.
You can also create different dashboards with various types of visual reports and keep that up on your screen as you’re monitoring your cameras and handling other tasks. You can drop those graphical reports into a dashboard and set a refresh rate so you can monitor your data in near-real-time. This gives you extra information at the ready, so you stay more in control of your environment.
Nextro is a New Zealand-based security integrator and Genetec Unified Elite Partner. For more information on how Nextro can help you design a new system or optimise your existing Genetec deployment, please get in touch here.